Last
updated: Monday 18th November 2024, 9:07 PT, AD
Creating and running a Java program using the JCreator editor
Please note:
If you don't have Java and JCreator installed on your computer,
you must install
Java and JCreator before using this tutorial.
The instructions on this page are for JCreator LE version 4.50.
If you're using JCreator version 3.50, click here
for user manual.
Watch this space for a link to a version 5 manual.
1. Start JCreator ...
Click on the Start button -> All Programs -> JCreator

You will then see a window entitled "JCreator - [Start Page]" ...

2. If you see the "Tip of the Day" window, close it.
3. Select File -> New -> Project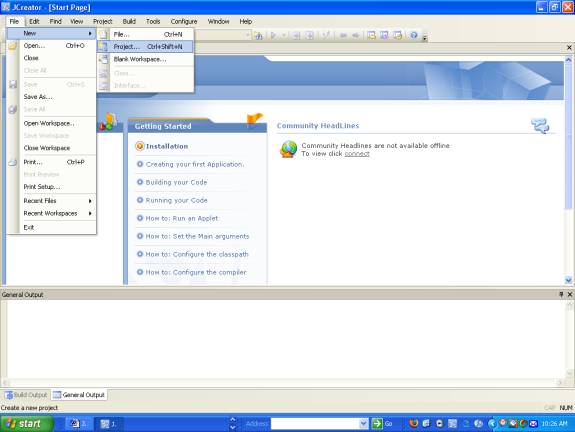
4. Click on the Next button to select a Basic Java Application (a regular Java program).

5. In the Name: box, type prog_01
NOTE:The Location, Source Path and Output paths
will be automatically filled in according to how the JCreator software was originally set up. The following screen just shows an example.
[If it is necessary to change any path,
click on the button to the right of the text input box.]

[If it is necessary to change any path,
click on the button to the right of the text input box.]
6. In the window above, click on the Finish button to finish.
7 When the project building is complete,
as shown in the window below, click on the Finish button to continue to the project window.

Click on the Finish button to continue to the project window.
8. You will then see a window entitled:
prog_01 -
JCreator
Close the File View and Package View windows for now,
just leaving the source code (prog_01.java) and General Output windows open.
You will see the following source code automatically supplied:
/** * @(#)prog_01.java * * prog_01 application * * @author * @version 1.00 2007/9/9 */ public class prog_01 { public static void main(String[] args) { // TODO, add your application code
System.out.println("Hello World!"); }} The green parts of the source code are comments,
which will not affect how the program runs (executes).
When the program above runs,
it will simply print the words Hello World! in the General Output window.
Before it can be executed,
the source code must be compiled.
This is explained in the next section...
9. To compile the program,
from the menu, select Build -> Build File.
Wait a few seconds while the program is compiled. If you made no changes to the source code, you will get the following message in the Build Output window after the code has been successfully compiled...--------------------Configuration: prog_01 - JDK version 1.6.0_02 <Default> - <Default>-------------------- Process completed.
10. To run the compiled program,
from the menu, select Run -> Run File.
In the General Output window, you will see the following output after the program prog_01 runs:--------------------Configuration: prog_01 - JDK version 1.6.0_02 <Default> - <Default>--------------------Hello World! Process completed. Congratulations! If you got this far,
you have successfully created,
compiled and run a java application program.
Try changing the source code
so that it has your name
instead of the word World,
then save, compile and
run the program again to see what happens...
If there are any errors in the source code, for example you accidentally deleted thesecond quotation mark after the word World,
you will get an error message like this one: unclosed string literal in which case you need to debug (remove errors from) your program.