Last updated: Monday 1st March 2021, 12:15 PT, AD
Raspberry Pi 2 by Dr Anne Dawson
Ubuntu MATE for the RPi 2
Installing SSH on RPi2 running Ubuntu MATE
Installing Motion on RPi2 running Ubuntu MATE
Installing Samba on RPi2 running Ubuntu MATE
Mounting an external hard drive to the RPi
Converting the RPi2 into a webcam server
Ubuntu MATE for the RPi 2
Installing SSH on RPi2 running Ubuntu MATE
SSH allows secure text-based shell sessions. SSH is not installed by default on Ubuntu MATE. It is installed and enabled on the RPi running the Raspian operating system. These instructions tell you how to install and run SSH on a RPi2 running Ubuntu MATE.
1. open a Linux terminal (Cntrl + A + T)
2. type: sudo apt-get install openssh-server
3. test the SSH connection: I could successfully connect to the RPi2 from my Google Android Nexus 5 phone using the ConnectBot app (username@hostname:port, e.g. anne@ 192.168.1.106:22)- using the wlan0 inet addr (IP address) established from issuing the ifconfig command in a terminal on the RPi. Note the RPi is connected to my network wirelessly.
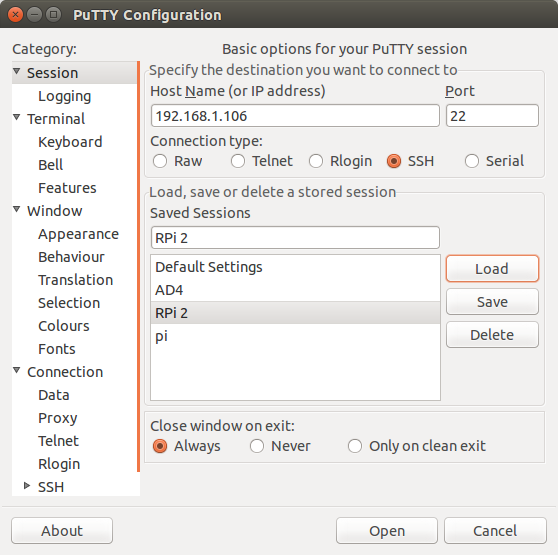
You can also connect to the RPI from another computer on your network by using the PuTTY SSH Client software. If PuTTY is not already installed on your Linux system, install it using the following command in a Linux terminal:
# sudo apt-get install putty
# putty
An example PuTTY session:
Installing Motion on RPi2 running Ubuntu MATE
Motion is free motion detection software allowing video surveillance from one or more cameras.
This is how I set up motion to work on my RPi2 using a Logitech web cam:


Plug in Logitech HD video camera to USB port on RPi.


Cntrl  + A + T to get a terminal


sudo -s


cd /dev


ls (to see the video camera device - video0)


# sudo apt-get update


# sudo apt-get install motion


[should you ever need  to remove motion: apt-get remove motion]


cd /etc/motion


cp motion.conf motion.conf.original.16aug2015 (keep a copy of the original configuration file)


edit motion.conf as per requirements, but as a test I left it "as is" and by default it writes .jpg and .avi files to /var/lib/motion


# motion -s  (runs motion in setup mode which is not daemon (background) mode - so you can see status of file writes in the terminal)


I changed the following settings in /etc/motion/motion.conf to match my requirements:


width: 1280


height: 720


framerate: 30


# the above 3 settings match my Logitech HD webcam


# plugged into a USB port on the RPi2


# http://www.farnell.com/datasheets/1335133.pdf


output_pictures off (no .jpg files)


ffmpeg_video_codec: mpeg4 (.avi files only)


text_double: on


target_dir: /var/lib/motion


movie_filename: %Y-%m-%d---%H-%M


I found the two videos in this link extremely useful:
How to set up Motion for video surveillance
Installing Samba on RPi2 running Ubuntu MATE
Samba is free Linux software which allows you to share files between computers on the same local area network. In my case I need to connect to the Rpi2 from my Linux laptop so that I can look at the video files generated by motion.


To install samba:


Cntrl  + A + T to get a terminal


# sudo apt-get install samba


if all goes OK, the # prompt will return, then:


# sudo apt-get install system-config-samba


if all goes OK, the # prompt will return, then:


# system-config-samba


At this point, in my case an error was generated because the following file did not exist: /etc/libuser.conf


To fix this problem I created a new (empty) file called libuser.conf in /etc and then restarted system-config-samba:


# system-config-samba


At this point a GUI opens for you to configure samba (without having to do manual edits to the .config file).


You can see the GUI running and how to set the samba values here:
Skip to 5:40 minutes


but in words, this is what you need to do:


Go to Preferences -> Samba Users and add your username (in my case anne).


On the main GUI page, click on the + button to add the target folder (in my case: /var/lib/motion  - which is where my motion files are written to on the RPi2) and the Share name - in my case anne, and select the Writable and Visible boxes. Then click on the Access tab and select the user who will have access to the target folder (in my case, anne), then click the OK button. Samba is now set up to share your target directory on the RPi2 with another computer on your network.


To access the RPI files from a Linux laptop on the same network as the RPI:


From the laptop desktop, open the Files (aka Nautilus).


Use the Ctrl and L keys to bring up the Location bar.


In the location bar type: smb://[IPaddress]/[sharename]


in my case: smb://192.168.1.106/anne


Enter the password for that user (sharename) to gain access to the target folder on the RPI.


You can see how this is done here:
Skip to 6:30 minutes
Mounting an external hard drive to the RPi
Converting the RPi2 into a webcam server
Search for more computer science topics
on www.annedawson.net
www.annedawson.net

