What is an Android app?Android Developer Fundamentals - Videos
An Android app is a software application
running on the Android platform.
In other words, an Android app
is a small program that runs
on your Android phone or tablet.
You may have an app for online banking,
an app for emailing.
You can download many free apps
from the Google Play Store.
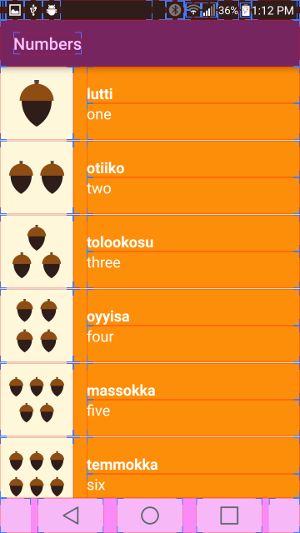
Watch the video below to see a running app...
Because the Android platform is built for
mobile devices,
a typical Android app is designed for
a smartphone or a tablet PC running
on the Android OS.
Android apps can be written using Kotlin,
Java, and C++ languages.
The Android SDK tools compile your code
along with any data and resource files
into an APK, an Android package.
The Android package is an archive file
with an .apk suffix.
One APK file contains all the contents
of an Android app and is the file
that Android-powered devices
use to install the app.
Each Android app lives in its own
security sandbox, protected by the following
Android security features:
The Android operating system
is a multi-user Linux system
in which each app is a different user.
By default, the system assigns each app
a unique Linux user ID
(the ID is used only by the system
and is unknown to the app).
The system sets permissions for all
the files in an app so that only
the user ID assigned to that app
can access them. Each process has
its own virtual machine (VM),
so an app's code runs in isolation
from other apps. By default,
every app runs in its own Linux process.
The Android system starts the process
when any of the app's components need
to be executed, and then shuts down
the process when it's no longer needed
or when the system must
recover memory for other apps.
The Android system implements
the principle of least privilege.
That is, each app, by default,
has access only to the components
that it requires to do its work and no more.
This creates a very secure environment
in which an app cannot access
parts of the system
for which it is not given permission.
However, there are ways for an app
to share data with other apps
and for an app to access system services...
ReferenceAnother Developer GuideAndroid Tutorial 1Android Tutorial 2
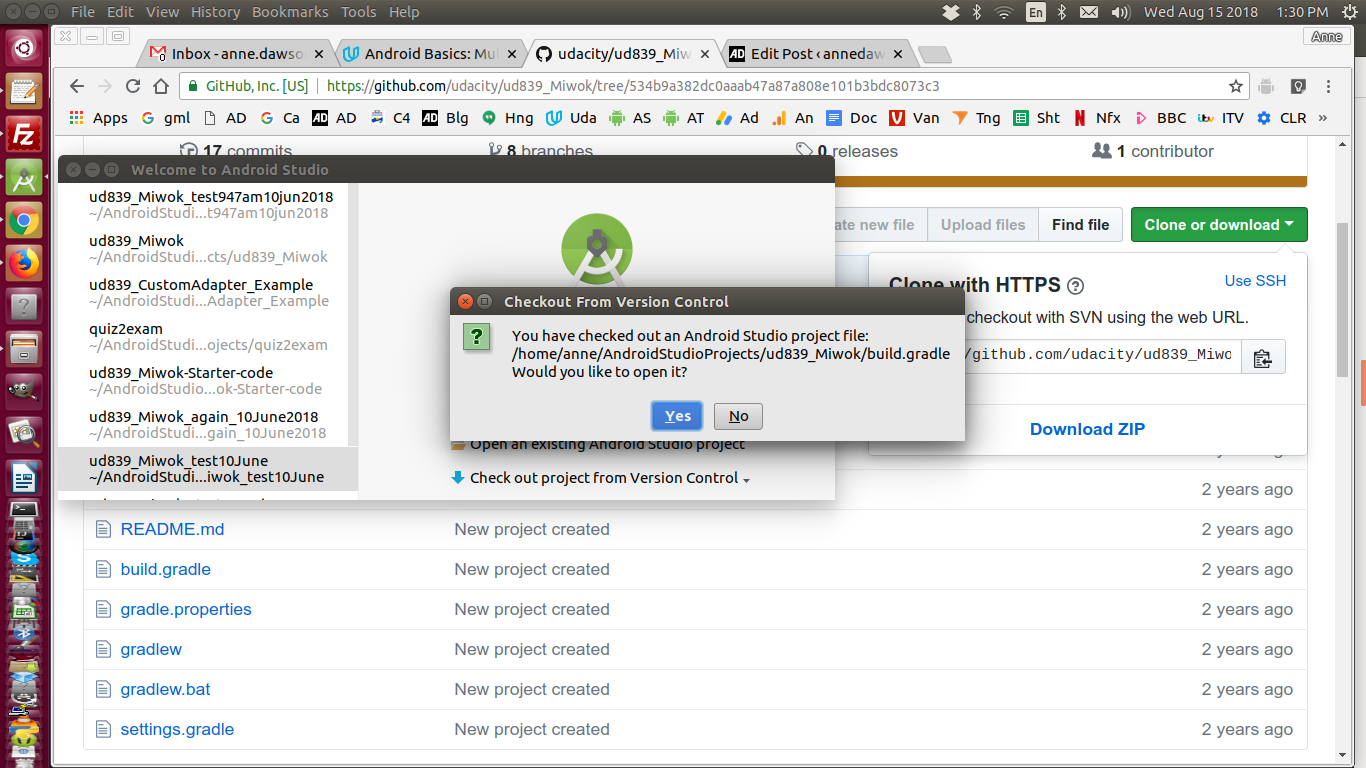
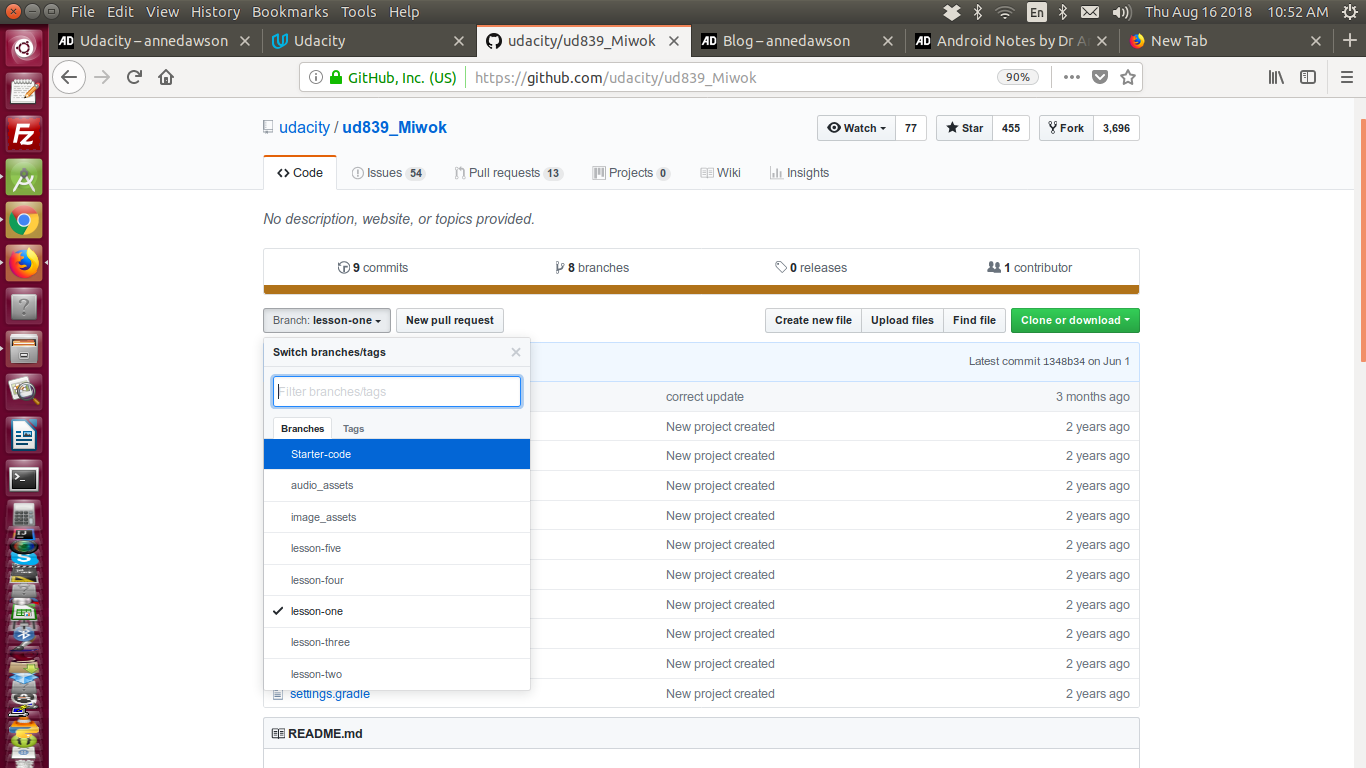
Check out an existing Android app from Version Control (GitHub)
Go to the GitHub project you want to clone,
click on the "Clone or Download" button,
copy the URL shown in the GitHub textbox...
then open Android Studio
and from the first screen click on
"Check out an existing Android app
from Version Control"
and select "GitHub"
from the list of version controls...
Paste in the URL copied from GitHub.
The Parent Directory
and Directory Name boxes
should be automatically filled in for you.
Then click on the Clone button
at the bottom of the screen...
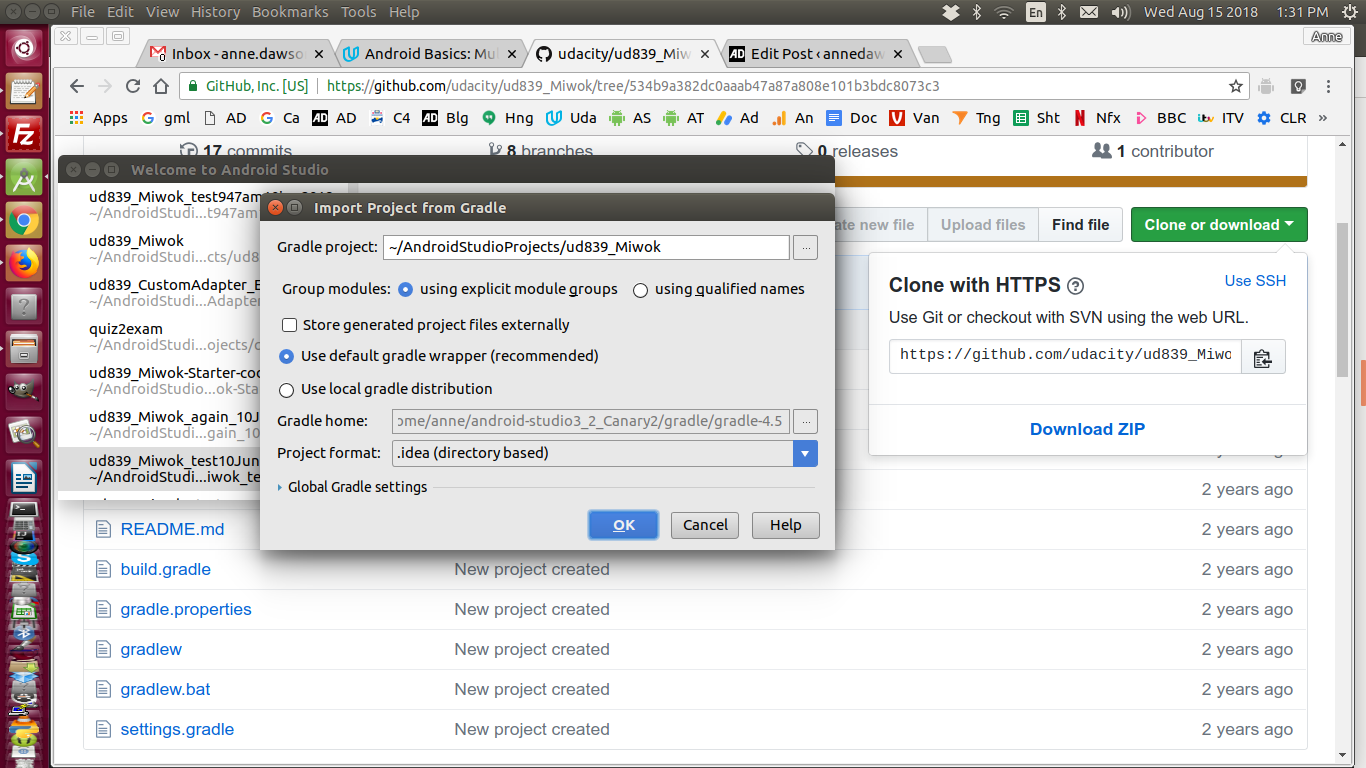
Click on "Yes" on the following screen...Click on "OK" on the following screen...IMPORTANT:
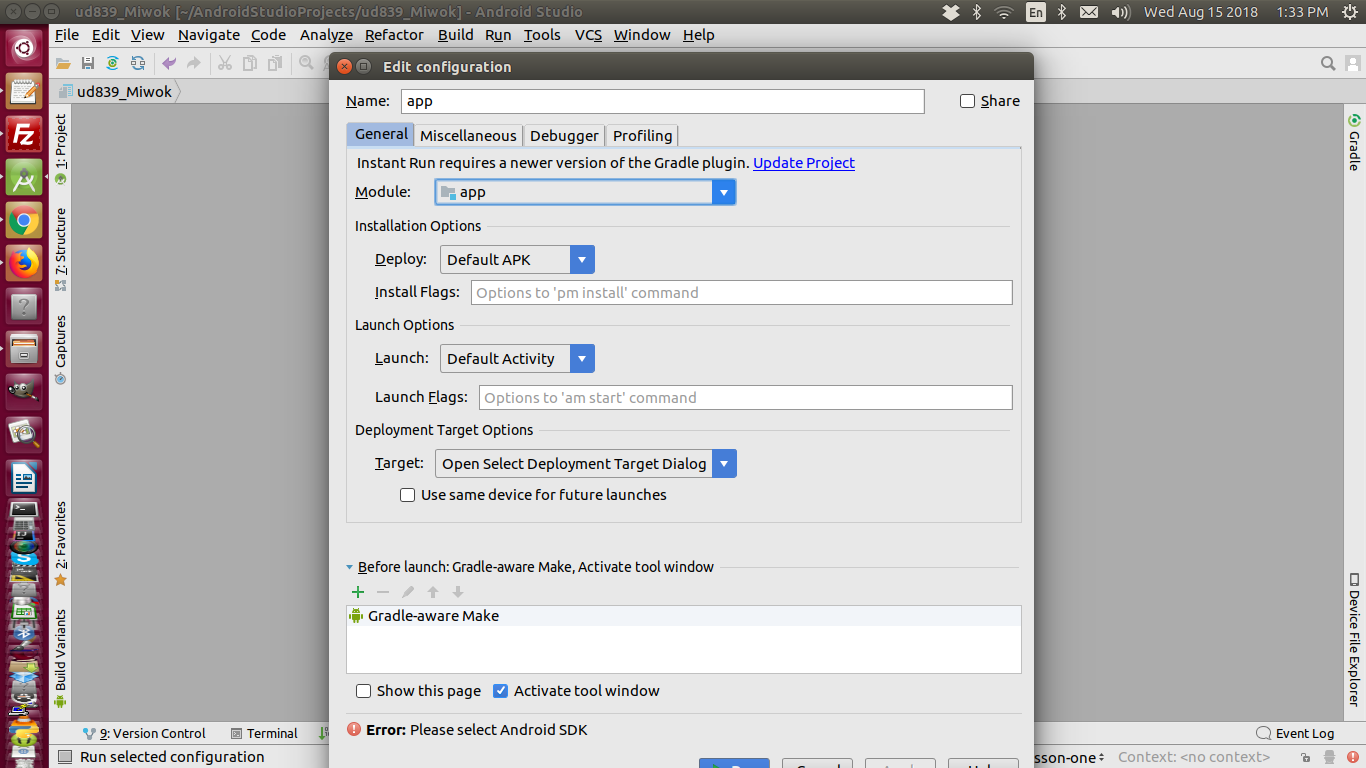
If you are presented with
the "Edit configuration" window
shown below,
click on the "Update Project"
link, then "Run".
Using the method above,
clone and open the GitHub project:
ud839_CustomAdapter_Example
and study the files
while reading the following...
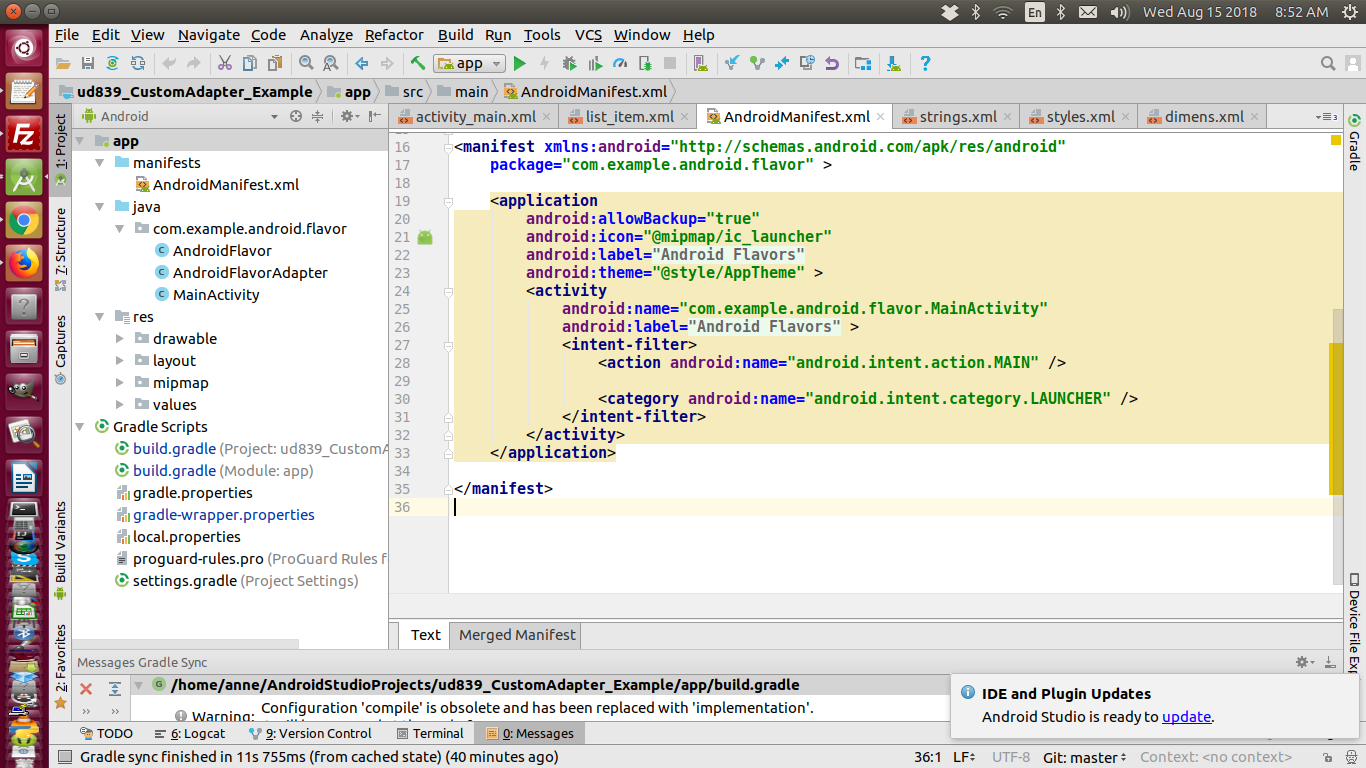
AndroidManifest.xml


Every app project must have an
AndroidManifest.xml file
(with precisely that name)
at the root of the project source set.

If you're using Android Studio
to build your app,
the manifest file is created for you,
and most of the essential
manifest elements
are added as you build your app
(especially when using code templates).

The manifest file describes
essential information about your app
to the Android build tools (Gradle),
the Android operating system,
and Google Play.
Examples of types of information stored
are values for app: icon, label,
theme and main activity.


For each app component
that you create in your app,
you must declare
a corresponding XML element
in AndroidManifest.xml:
e.g. Activity, Service,
BroadcastReceiver or ContentProvider...


Merge multiple manifest files

Your APK file can contain
just one AndroidManifest.xml file,
but your Android Studio project may contain
several—provided by the main source set,
build variants, and imported libraries.
So when building your app,
the Gradle build merges all manifest files
into a single manifest file
that's packaged into your APK.

The manifest merger tool combines
all XML elements from each file
by following some merge heuristics
and by obeying merge preferences
that you have defined with
special XML attributes.

Reference
Intents and Intent Filters


An intent starts an activity, a service or a broadcast.


1.  Starting an activity

An activity represents
a single screen in an app.
You can start a new activity
by passing an intent to startActivity(),
e.g. startActivity(numbersIntent);
The intent describes the activity to start
and carries any necessary data.

If you want to receive a result
from the activity when it finishes,
call startActivityForResult().
Your activity receives the result
as a separate Intent object
in your activity's onActivityResult() callback.
For more information, see the Activities guide.


2.  Starting a service

A Service is a component that
performs operations in the background
without a user interface.


3.  Starting a broadcast

A broadcast is a message
that any app can receive.
The system delivers various broadcasts
for system events,
such as when the system boots up
or the device starts charging.
You can deliver a broadcast to other apps
by passing an Intent to sendBroadcast()
or sendOrderedBroadcast().


Figure 1. How an implicit intent is delivered
through the system to start another activity:
[1] Activity A creates an Intent
with an action description
and passes it to startActivity().
[2] The Android System searches all apps
for an intent filter that matches the intent.
When a match is found,
[3] the system starts
the matching activity (Activity B)
by invoking its onCreate() method
and passing it the Intent.


Sometimes the intention
is to start an activity such as
displaying a web page at a certain URL.
Such an activity will require a URI, a  URL or a URN.

How an explicit intent is delivered
through the system to start another activity:


// Executed in an Activity, so 'this' is the Context (i.e. scope of the activity)
// The fileUrl is a string URL, such as "http://www.example.com/image.png"
Intent downloadIntent = new Intent(this, DownloadService.class);
downloadIntent.setData(Uri.parse(fileUrl));
startService(downloadIntent);


Reference
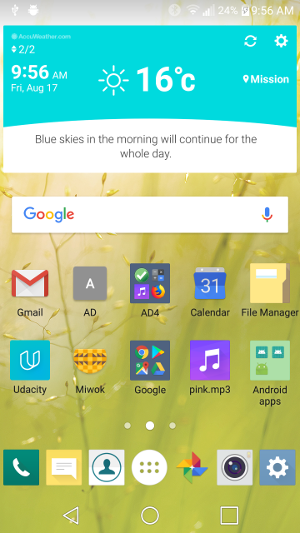
What happens
when you click
on an app's launch icon?
In Android, the launcher is your phone's
home screen - the screen where you
launch your apps...
the icon launcher (ic_launcher.png)
is the icon you click on
to launch the app...
Launcher app calls
startActivity() with an intent
(as defined in the AndroidManifest.xml file).
[action = Intent.ACTION_MAIN,
category = Intent.CATEGORY_LAUNCHER
flag = Intent.FLAG_ACTIVITY_NEW_TASK].
Regarding
Intent.FLAG_ACTIVITY_NEW_TASK
from docs:
When using this flag,
if a task is already running
for the activity you are now starting,
then a new activity will not be started;
instead, the current task
will simply be brought
to the front of the screen
with the state it was last in.
ReferenceWhat happens at launch time?What happens when you start an app?
Android Activity LifecycleActivity Lifecycle
Google created the following figure showing
the Android activity lifecycle
the methods related to every transition.
In most cases you would need to
take care only about things that happen
at the beginning in onCreate().
The Android system
takes care about the rest.
An application might consist of
just one activity -
or it may contain several.
Typically, one of the activities
is marked as the first one
that should be presented to the user
when the application is launched.
This information is contained in
the manifest file.
Moving from one activity to another
is accomplished by
having the current activity start the next one.
What is a View?Views, Layouts and ResourcesCommon Android Views - Cheat Sheet pdfView objects are the basic building blocks
of User Interface(UI) elements in Android.
A view is a screen on your phone.
View is a simple rectangle box
which responds to the user's actions.
Examples are TextView, EditText, ImageView,
Button, CheckBox etc..
View refers to the android.view.View class,
which is the base class of all UI classes.
View class represents
the basic building block
for user interface components.
A View occupies a rectangular area
on the screen and is responsible
for drawing and event handling.
View is the base class for widgets,
which are used to create interactive
UI components such as buttons,
text fields, etc.
View (TextView) A user interface element
that displays text to the user.
To provide user-editable text, see EditText.
View (ImageView) Displays image
resources, for example Bitmap
or Drawable resources.
ImageView is also commonly used to
apply tints to an image
and handle image scaling.
View (EditText) A user interface
element that allows user-editable text.
View (Button)
View (CheckBox) A checkbox
is a specific type of two-states button
that can be either checked or unchecked.
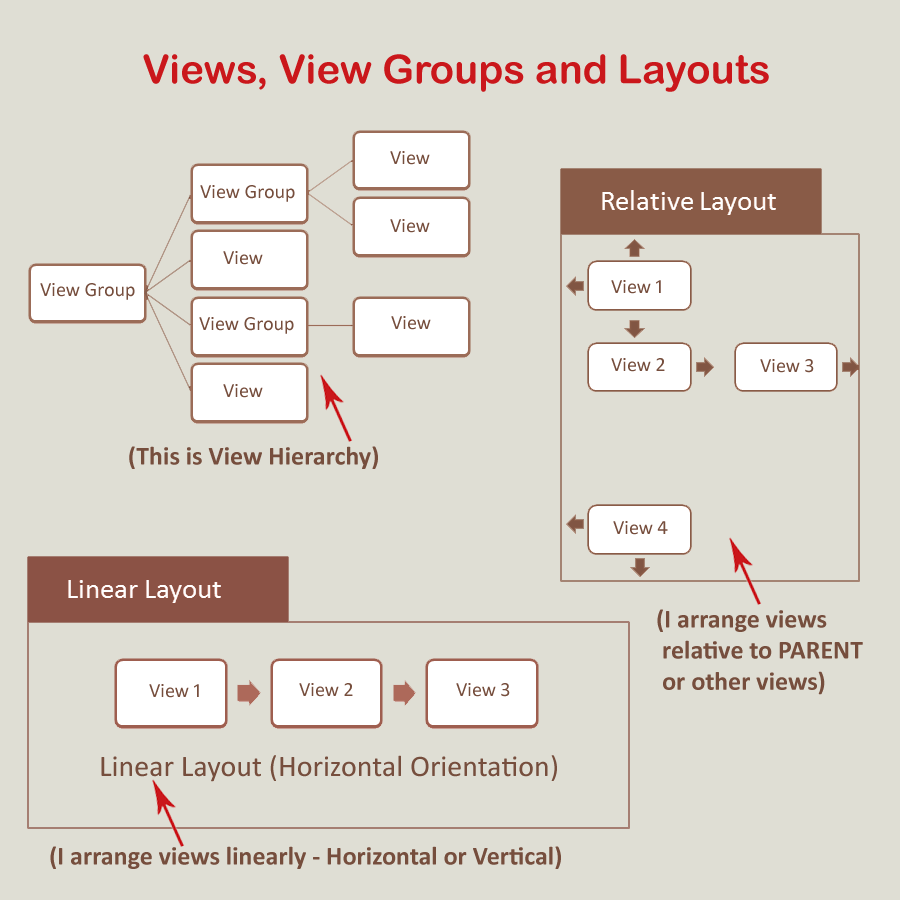
View (ViewGroup) is an invisible container.
It holds Views and ViewGroups.
For example, LinearLayout is the ViewGroup
that contains other views
such as Button views,
TextViews and other Layouts.
LinearLayout is a layout that
arranges other views either
horizontally in a single column
or vertically in a single row.
ViewGroup is the base class
for Layouts.
A ViewGroup is a special view
that can contain other views
(called children.) The view group
is the base class
for layouts and views containers.
This class also defines the
ViewGroup.LayoutParams class
which serves as
the base class for layouts parameters.
View (ListView) displays a
vertically-scrollable collection of views,
where each view is positioned immediately
below the previous view in the list.
For a more modern, flexible,
and performant approach
to displaying lists, use RecyclerView.
A ListView object is an adapter view
that does not know the details,
such as type and contents,
of the views it contains.
Instead a ListView object requests
views on demand
from a ListAdapter as needed,
such as to display new views
as the user scrolls up or down.
Android Layouts are made from Views
Android's res/layout/activity_main.xml
is the layout for the main activity
of the app.
You can view the text of the layout files
and see the Preview at the same time by
clicking the Preview tab on the right hand side
of the Android Studio screen when
a layout file is currently in view...
The LinearLayout class
The ConstraintLayout class
The ConstraintLayout view container
is the preferred ViewGroup for performance reasons.
Mastering the ConstraintLayout
Using different branches
of app code
stored on GitHub (Git)
This is assuming that Git is installed
and an account on GitHub is current.
To import a project branch from GitHub into Android Studio,
this is one method that works for me:
at the very bottom line of any Android Studio screen,
on the right hand side
shows a link to all git branches available
at the GitHub repository for the current app...
On the very bottom line on screen above
you will see the word "Git:"...
Click on the word Git:
at the bottom right of the screenSimply select the branch
you want to import
into Android Studio.IMPORTANT NOTE WHEN IMPORTING
A GITHUB BRANCH
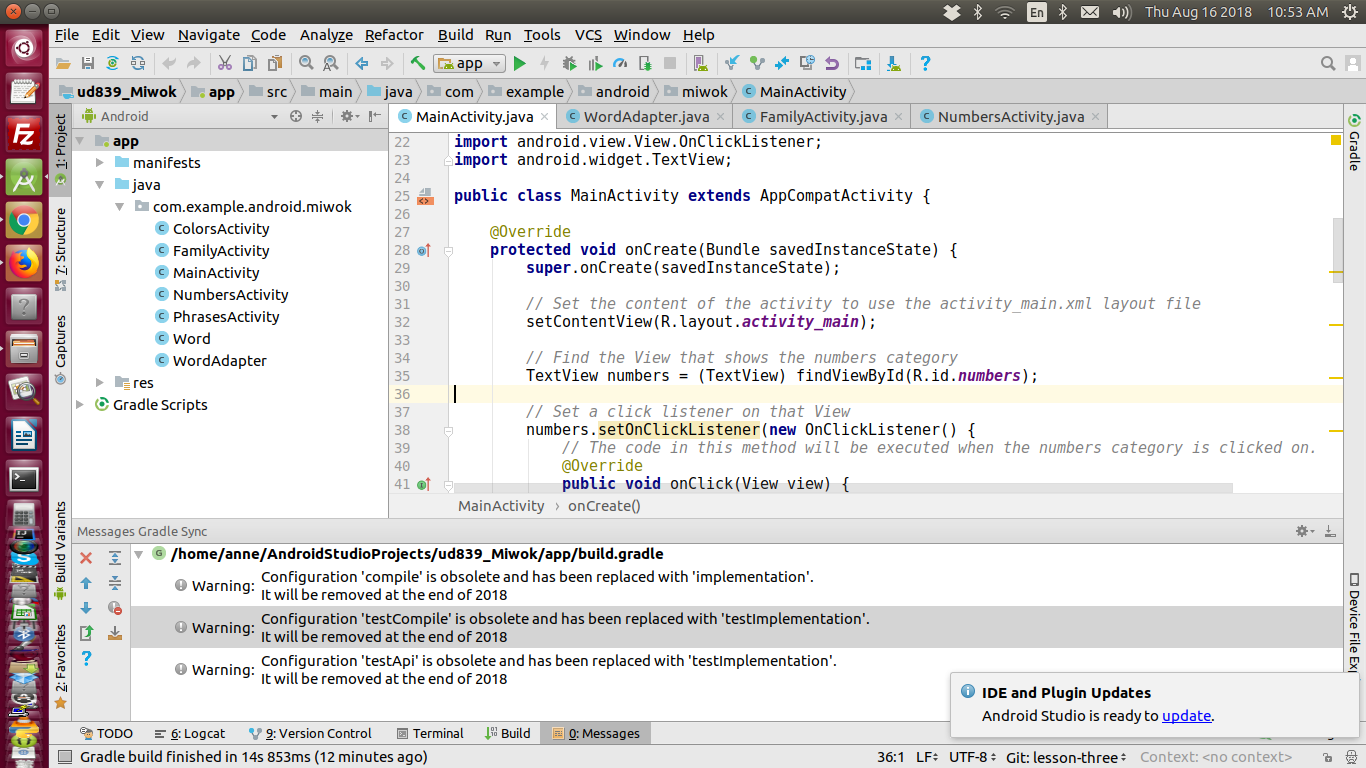
The code will run on your device,
however you may notice that the
AppCompatActivity class
is highlighted in red
in MainActivity.java with the error:
'Cannot resolve symbol AppCompatActivity'.
There may be other symbols
that are highlighted in red.
This means that the current project
is out of sync with the Gradle files.
To correct this, from Android Studio,
simply click on the main File menu
then select:
"Sync Project with Gradle Files".
SQLite
SQL is query language.
Sqlite is embeddable relational database management system.
Unlike other databases (like SQL Server and MySQL)
SQLite does not support stored procedures.
SQLite is file-based, unlike other databases,
like SQL Server and MySQL which are server-based.
Save data using SQLite
SQLite comes with the Android SDK
and is located in /tools folder of your install.
You can add this folder to your PATH variable
and thus open a database file from every command prompt.
Remember that there are some older Android ROMs
which don't come with an SQLite Editor installed.
You would have to install SQLite manually in that case.
Working with databases from within your app should work
seemlessly as it's a basic feature of the Android OS.
The following is a very useful tutorial
on how to make an app
to create a database
and store to the database
data entered on screen:
All code is there so I suggest try it:
Android Studio example app using SQLite.Use sqlite3 to inspect Android Studio databases from the command line.
anne@Inspiron-15R:~$ sqlite3
SQLite tutorial
Run a command script in sqlite3

Execute SQL statements from a file

Suppose we have a file named commands.txt
in the c:/sqlite/ folder
with the following content:


SELECT albumid, title
FROM albums
ORDER BY title
LIMIT 10;

To execute the SQL statements in the commands.txt file,
you use the .read FILENAME command as follows:


sqlite> .mode column
sqlite> .read c:/sqlite/commands.txt
156         ...And Justice For All
257         20th Century Masters -
296         A Copland Celebration,
94          A Matter of Life and D
95          A Real Dead One
96          A Real Live One
285         A Soprano Inspired


NOTE: The above is taken from:
sqlitetutorial.net/sqlite-commands
Create an SQLite database and table and populate with data from text file (in csv format)
If you want to delete
any previous questions.db database,
simply navigate to the file on your file system,
and delete the file.
To open the database questions.db
(or create a new one if it doesn't aleady exist)...
anne@Inspiron-15R:~$ sqlite3 questions.db
If you put the following code in a text file
(e.g. commands.txt), then you can
execute the textfile commands through sqlite3
by following the instructions
shown below the code.
CREATE TABLE questions_mc (
question_id integer,
question_text text ,
answer_1 text NOT NULL,
answer_2 text NOT NULL,
answer_3 text NOT NULL,
answer_4 text NOT NULL,
correct_answer text NOT NULL,
category text NOT NULL,
difficulty text NOT NULL
);
Note that questions.csv is a simple text file
saved with the extension .csv
and has comma separated values.
This is the contents of questions.csv
1,What is the data type of the following value: 3.142,string,boolean,float,int,float,data types,easy
2,What is the data type of the following value: 3,string,boolean,float,int,float,data types,easy
sqlite> .read commands.txt
sqlite> .mode csv
sqlite> .import questions.csv questions_mc
sqlite> select * from questions_mc;
Read this about .mode:
.mode MODE ?TABLE? Set output mode where MODE is one of:
ascii Columns/rows delimited by 0x1F and 0x1E
csv Comma-separated values
column Left-aligned columns. (See .width)
html HTML <table> code
insert SQL insert statements for TABLE
line One value per line
list Values delimited by "|"
quote Escape answers as for SQL
tabs Tab-separated values
tcl TCL list elements
the above from: https://www.sqlite.org/cli.html
Create an SQLite database from a text file

Say you have a file text.txt of CSV format:

name1,content1
name2,content2

Try the commands below
to import the data in test.txt
into a new database called test.db

D:\test>sqlite3 test.db
SQLite version 3.6.23
Enter ".help" for instructions
Enter SQL statements terminated with a ";"
sqlite> create table myTable(nameOfText TEXT, contents TEXT);
sqlite> .separator ","
sqlite> .import test.txt myTable
sqlite> select * from myTable;
name1,content1
name2,content2
sqlite>
Writing the result of an SQLite query to a text file

6. Writing results to a file

By default, sqlite3 sends query results to standard output.
You can change this using the ".output" and ".once" commands.
Just put the name of an output file as an argument to .output
and all subsequent query results will be written to that file.
Or use the .once command instead of .output
and output will only be redirected for the single next command
before reverting to the console.
Use .output with no arguments
to begin writing to standard output again.

For example:

sqlite> .mode list
sqlite> .separator |
sqlite> .output test_file_1.txt
sqlite> select * from tbl1;
sqlite> .exit
$ cat test_file_1.txt
hello|10
goodbye|20
$
If the first character of the ".output" or ".once" filename
is a pipe symbol ("|")
then the remaining characters
are treated as a command
and the output is sent to that command.

This makes it easy
to pipe the results of a query
into some other process.

For example, the "open -f" command on a Mac
opens a text editor
to display the content
that it reads from standard input.

So to see the results of a query in a text editor,
one could type:

sqlite3> .once '|open -f'
sqlite3> SELECT * FROM bigTable;

If the ".output" or ".once" commands
have an argument of "-e"
then output is collected into a temporary file
and the system text editor is invoked
on that text file.

Thus, the command ".once -e" achieves
the same result as ".once '|open -f'"
but with the benefit of being portable across all systems.

If the ".output" or ".once" commands
have a "-x" argument,
that causes them to accumulate output
as Comma-Separated-Values (CSV)
in a temporary file,
then invoke the default system utility
for viewing CSV files
(usually a spreadsheet program) on the result.

This is a quick way
of sending the result of a query
to a spreadsheet for easy viewing:

sqlite3> .once -x
sqlite3> SELECT * FROM bigTable;

The ".excel" command is an alias for ".once -x".
It does exactly the same thing.


NOTE: The above is taken from:
sqlite.org
Indexing

Indexing is a way of sorting a number of records
on multiple fields.
Creating an index on a field in a table
creates another data structure
which holds the field value,
and a pointer to the record it relates to.
This index structure is then sorted,
allowing Binary Searches to be performed on it.


NOTE: The above is taken from:
sqlite.org
SQLite Primary key, ROWID and Constraints
Whenever you create a table without the WITHOUT ROWID constraint,
you get an implicit auto increment column called rowid.
Such a table is known as a rowid table.
The true primary key for a rowid table is the rowid.
rowid is a pseudocolumn that
uniquely defines a single row in a database table.
The term pseudocolumn is used because
you can refer to ROWID in the WHERE clauses
of a query
as you would refer to a column stored in your database;
the difference is
you cannot insert, update, or delete ROWID values.
You won't see it if you do this:
SELECT * FROM tablename;
You have to specifically ask for it:
SELECT rowid,otherfield FROM tablename;rowidhttps://www.sqlite.org/rowidtable.htmlhttps://www.sqlite.org/lang_createtable.html#rowid
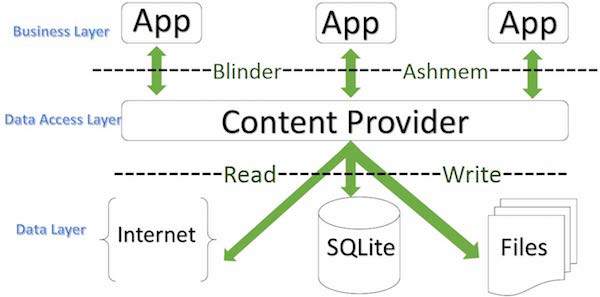
Android Content Providers

A content provider is only required
if you need to share data
between multiple applications.

If you don't need to share data
amongst multiple applications
you can use a database directly
via SQLiteDatabase.

If you want to harness the power
of a content provider (e.g. query
and send results to file), you would
create a contact provider and link it
to your pre-made database
originally imported from a csv file.

A content provider component supplies data
from one application to other applications on request.
Such requests are handled by the methods
of the ContentResolver class.
 An Android app is a software application
running on the Android platform.
In other words, an Android app
is a small program that runs
on your Android phone or tablet.
You may have an app for online banking,
an app for emailing.
You can download many free apps
from the Google Play Store.
Watch the video below to see a running app...
Because the Android platform is built for
mobile devices,
a typical Android app is designed for
a smartphone or a tablet PC running
on the Android OS.
Android apps can be written using Kotlin,
Java, and C++ languages.
The Android SDK tools compile your code
along with any data and resource files
into an APK, an Android package.
The Android package is an archive file
with an .apk suffix.
One APK file contains all the contents
of an Android app and is the file
that Android-powered devices
use to install the app.
Each Android app lives in its own
security sandbox, protected by the following
Android security features:
The Android operating system
is a multi-user Linux system
in which each app is a different user.
By default, the system assigns each app
a unique Linux user ID
(the ID is used only by the system
and is unknown to the app).
The system sets permissions for all
the files in an app so that only
the user ID assigned to that app
can access them. Each process has
its own virtual machine (VM),
so an app's code runs in isolation
from other apps. By default,
every app runs in its own Linux process.
The Android system starts the process
when any of the app's components need
to be executed, and then shuts down
the process when it's no longer needed
or when the system must
recover memory for other apps.
The Android system implements
the principle of least privilege.
That is, each app, by default,
has access only to the components
that it requires to do its work and no more.
This creates a very secure environment
in which an app cannot access
parts of the system
for which it is not given permission.
However, there are ways for an app
to share data with other apps
and for an app to access system services...
Reference
Another Developer Guide
Android Tutorial 1
Android Tutorial 2
An Android app is a software application
running on the Android platform.
In other words, an Android app
is a small program that runs
on your Android phone or tablet.
You may have an app for online banking,
an app for emailing.
You can download many free apps
from the Google Play Store.
Watch the video below to see a running app...
Because the Android platform is built for
mobile devices,
a typical Android app is designed for
a smartphone or a tablet PC running
on the Android OS.
Android apps can be written using Kotlin,
Java, and C++ languages.
The Android SDK tools compile your code
along with any data and resource files
into an APK, an Android package.
The Android package is an archive file
with an .apk suffix.
One APK file contains all the contents
of an Android app and is the file
that Android-powered devices
use to install the app.
Each Android app lives in its own
security sandbox, protected by the following
Android security features:
The Android operating system
is a multi-user Linux system
in which each app is a different user.
By default, the system assigns each app
a unique Linux user ID
(the ID is used only by the system
and is unknown to the app).
The system sets permissions for all
the files in an app so that only
the user ID assigned to that app
can access them. Each process has
its own virtual machine (VM),
so an app's code runs in isolation
from other apps. By default,
every app runs in its own Linux process.
The Android system starts the process
when any of the app's components need
to be executed, and then shuts down
the process when it's no longer needed
or when the system must
recover memory for other apps.
The Android system implements
the principle of least privilege.
That is, each app, by default,
has access only to the components
that it requires to do its work and no more.
This creates a very secure environment
in which an app cannot access
parts of the system
for which it is not given permission.
However, there are ways for an app
to share data with other apps
and for an app to access system services...
Reference
Another Developer Guide
Android Tutorial 1
Android Tutorial 2
 Click on "Yes" on the following screen...
 Click on "OK" on the following screen...
 IMPORTANT:
If you are presented with
the "Edit configuration" window
shown below,
click on the "Update Project"
link, then "Run".
IMPORTANT:
If you are presented with
the "Edit configuration" window
shown below,
click on the "Update Project"
link, then "Run".
 Using the method above,
clone and open the GitHub project:
ud839_CustomAdapter_Example
and study the files
while reading the following...
Using the method above,
clone and open the GitHub project:
ud839_CustomAdapter_Example
and study the files
while reading the following...
 Merge multiple manifest files
Your APK file can contain
just one AndroidManifest.xml file,
but your Android Studio project may contain
several—provided by the main source set,
build variants, and imported libraries.
So when building your app,
the Gradle build merges all manifest files
into a single manifest file
that's packaged into your APK.
The manifest merger tool combines
all XML elements from each file
by following some merge heuristics
and by obeying merge preferences
that you have defined with
special XML attributes.
Reference
Merge multiple manifest files
Your APK file can contain
just one AndroidManifest.xml file,
but your Android Studio project may contain
several—provided by the main source set,
build variants, and imported libraries.
So when building your app,
the Gradle build merges all manifest files
into a single manifest file
that's packaged into your APK.
The manifest merger tool combines
all XML elements from each file
by following some merge heuristics
and by obeying merge preferences
that you have defined with
special XML attributes.
Reference 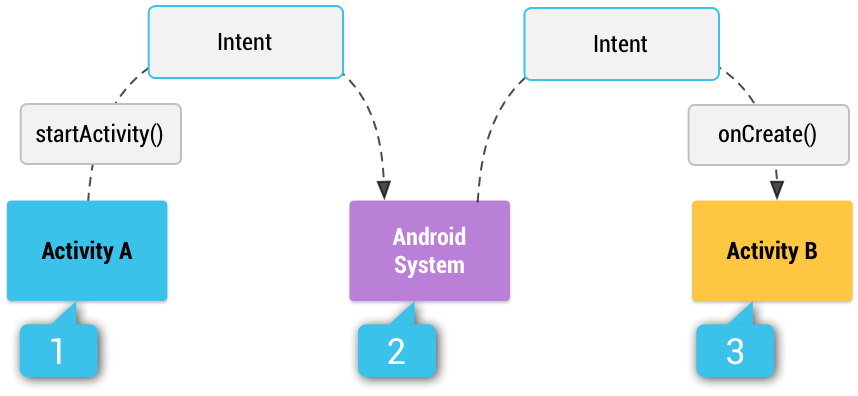 Figure 1. How an implicit intent is delivered
through the system to start another activity:
[1] Activity A creates an Intent
with an action description
and passes it to startActivity().
[2] The Android System searches all apps
for an intent filter that matches the intent.
When a match is found,
[3] the system starts
the matching activity (Activity B)
by invoking its onCreate() method
and passing it the Intent.
Figure 1. How an implicit intent is delivered
through the system to start another activity:
[1] Activity A creates an Intent
with an action description
and passes it to startActivity().
[2] The Android System searches all apps
for an intent filter that matches the intent.
When a match is found,
[3] the system starts
the matching activity (Activity B)
by invoking its onCreate() method
and passing it the Intent.
 Sometimes the intention
is to start an activity such as
displaying a web page at a certain URL.
Such an activity will require a URI, a URL or a URN.
How an explicit intent is delivered
through the system to start another activity:
Sometimes the intention
is to start an activity such as
displaying a web page at a certain URL.
Such an activity will require a URI, a URL or a URN.
How an explicit intent is delivered
through the system to start another activity:
 An application might consist of
just one activity -
or it may contain several.
Typically, one of the activities
is marked as the first one
that should be presented to the user
when the application is launched.
This information is contained in
the manifest file.
Moving from one activity to another
is accomplished by
having the current activity start the next one.
An application might consist of
just one activity -
or it may contain several.
Typically, one of the activities
is marked as the first one
that should be presented to the user
when the application is launched.
This information is contained in
the manifest file.
Moving from one activity to another
is accomplished by
having the current activity start the next one.
 Common Android Views - Cheat Sheet pdf
View objects are the basic building blocks
of User Interface(UI) elements in Android.
A view is a screen on your phone.
View is a simple rectangle box
which responds to the user's actions.
Examples are TextView, EditText, ImageView,
Button, CheckBox etc..
View refers to the android.view.View class,
which is the base class of all UI classes.
View class represents
the basic building block
for user interface components.
A View occupies a rectangular area
on the screen and is responsible
for drawing and event handling.
View is the base class for widgets,
which are used to create interactive
UI components such as buttons,
text fields, etc.
View (TextView) A user interface element
that displays text to the user.
To provide user-editable text, see EditText.
View (ImageView) Displays image
resources, for example Bitmap
or Drawable resources.
ImageView is also commonly used to
apply tints to an image
and handle image scaling.
View (EditText) A user interface
element that allows user-editable text.
View (Button)
View (CheckBox) A checkbox
is a specific type of two-states button
that can be either checked or unchecked.
View (ViewGroup) is an invisible container.
It holds Views and ViewGroups.
For example, LinearLayout is the ViewGroup
that contains other views
such as Button views,
TextViews and other Layouts.
LinearLayout is a layout that
arranges other views either
horizontally in a single column
or vertically in a single row.
ViewGroup is the base class
for Layouts.
A ViewGroup is a special view
that can contain other views
(called children.) The view group
is the base class
for layouts and views containers.
This class also defines the
ViewGroup.LayoutParams class
which serves as
the base class for layouts parameters.
View (ListView) displays a
vertically-scrollable collection of views,
where each view is positioned immediately
below the previous view in the list.
For a more modern, flexible,
and performant approach
to displaying lists, use RecyclerView.
A ListView object is an adapter view
that does not know the details,
such as type and contents,
of the views it contains.
Instead a ListView object requests
views on demand
from a ListAdapter as needed,
such as to display new views
as the user scrolls up or down.
Android Layouts are made from Views
Android's res/layout/activity_main.xml
is the layout for the main activity
of the app.
You can view the text of the layout files
and see the Preview at the same time by
clicking the Preview tab on the right hand side
of the Android Studio screen when
a layout file is currently in view...
The LinearLayout class
The ConstraintLayout class
The ConstraintLayout view container
is the preferred ViewGroup for performance reasons.
Mastering the ConstraintLayout
Common Android Views - Cheat Sheet pdf
View objects are the basic building blocks
of User Interface(UI) elements in Android.
A view is a screen on your phone.
View is a simple rectangle box
which responds to the user's actions.
Examples are TextView, EditText, ImageView,
Button, CheckBox etc..
View refers to the android.view.View class,
which is the base class of all UI classes.
View class represents
the basic building block
for user interface components.
A View occupies a rectangular area
on the screen and is responsible
for drawing and event handling.
View is the base class for widgets,
which are used to create interactive
UI components such as buttons,
text fields, etc.
View (TextView) A user interface element
that displays text to the user.
To provide user-editable text, see EditText.
View (ImageView) Displays image
resources, for example Bitmap
or Drawable resources.
ImageView is also commonly used to
apply tints to an image
and handle image scaling.
View (EditText) A user interface
element that allows user-editable text.
View (Button)
View (CheckBox) A checkbox
is a specific type of two-states button
that can be either checked or unchecked.
View (ViewGroup) is an invisible container.
It holds Views and ViewGroups.
For example, LinearLayout is the ViewGroup
that contains other views
such as Button views,
TextViews and other Layouts.
LinearLayout is a layout that
arranges other views either
horizontally in a single column
or vertically in a single row.
ViewGroup is the base class
for Layouts.
A ViewGroup is a special view
that can contain other views
(called children.) The view group
is the base class
for layouts and views containers.
This class also defines the
ViewGroup.LayoutParams class
which serves as
the base class for layouts parameters.
View (ListView) displays a
vertically-scrollable collection of views,
where each view is positioned immediately
below the previous view in the list.
For a more modern, flexible,
and performant approach
to displaying lists, use RecyclerView.
A ListView object is an adapter view
that does not know the details,
such as type and contents,
of the views it contains.
Instead a ListView object requests
views on demand
from a ListAdapter as needed,
such as to display new views
as the user scrolls up or down.
Android Layouts are made from Views
Android's res/layout/activity_main.xml
is the layout for the main activity
of the app.
You can view the text of the layout files
and see the Preview at the same time by
clicking the Preview tab on the right hand side
of the Android Studio screen when
a layout file is currently in view...
The LinearLayout class
The ConstraintLayout class
The ConstraintLayout view container
is the preferred ViewGroup for performance reasons.
Mastering the ConstraintLayout
 This is assuming that Git is installed
and an account on GitHub is current.
To import a project branch from GitHub into Android Studio,
this is one method that works for me:
at the very bottom line of any Android Studio screen,
on the right hand side
shows a link to all git branches available
at the GitHub repository for the current app...
This is assuming that Git is installed
and an account on GitHub is current.
To import a project branch from GitHub into Android Studio,
this is one method that works for me:
at the very bottom line of any Android Studio screen,
on the right hand side
shows a link to all git branches available
at the GitHub repository for the current app...
 On the very bottom line on screen above
you will see the word "Git:"...
Click on the word Git:
at the bottom right of the screen
On the very bottom line on screen above
you will see the word "Git:"...
Click on the word Git:
at the bottom right of the screen
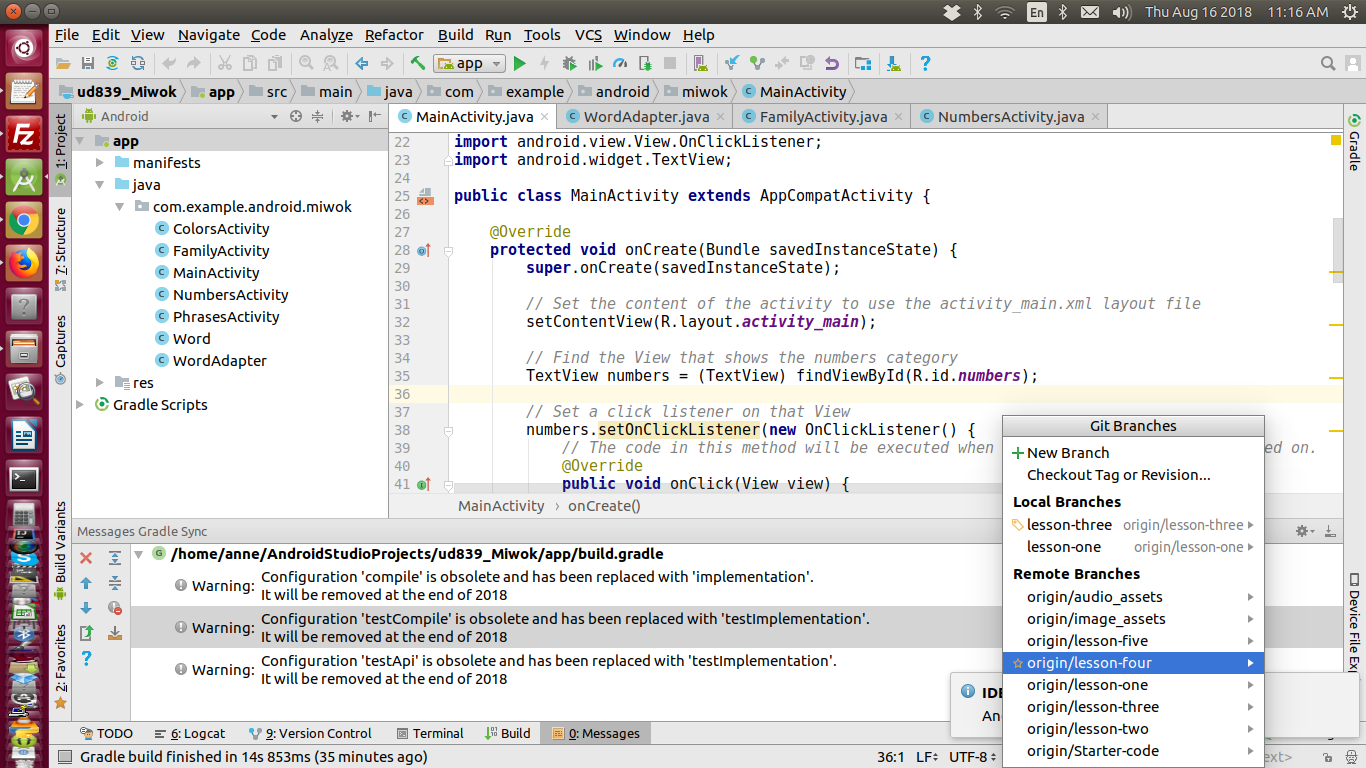 Simply select the branch
you want to import
into Android Studio.
IMPORTANT NOTE WHEN IMPORTING
A GITHUB BRANCH
The code will run on your device,
however you may notice that the
AppCompatActivity class
is highlighted in red
in MainActivity.java with the error:
'Cannot resolve symbol AppCompatActivity'.
There may be other symbols
that are highlighted in red.
This means that the current project
is out of sync with the Gradle files.
To correct this, from Android Studio,
simply click on the main File menu
then select:
"Sync Project with Gradle Files".
Simply select the branch
you want to import
into Android Studio.
IMPORTANT NOTE WHEN IMPORTING
A GITHUB BRANCH
The code will run on your device,
however you may notice that the
AppCompatActivity class
is highlighted in red
in MainActivity.java with the error:
'Cannot resolve symbol AppCompatActivity'.
There may be other symbols
that are highlighted in red.
This means that the current project
is out of sync with the Gradle files.
To correct this, from Android Studio,
simply click on the main File menu
then select:
"Sync Project with Gradle Files".